Sometimes, the task of web scraping involves obtaining various types of images for training and fine-tuning large models like LLMs. Essential steps include downloading, processing, and storing these images.
This article uses images from Stable Diffusion as an example to teach you how to use web scraping to acquire, clean, and store image data.
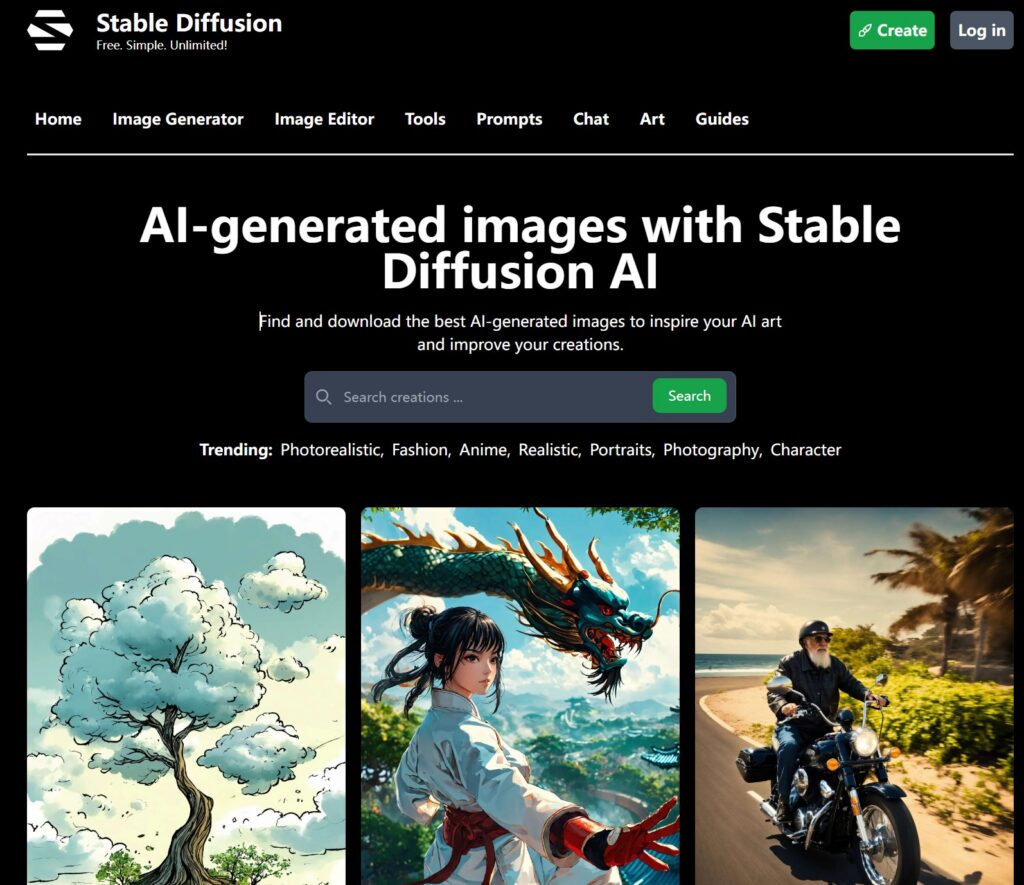
Stable Diffusion is an AI image generation website with many creative images generated by users using various models.
We press the F12 debugging button in the browser to find the src download path of the image.
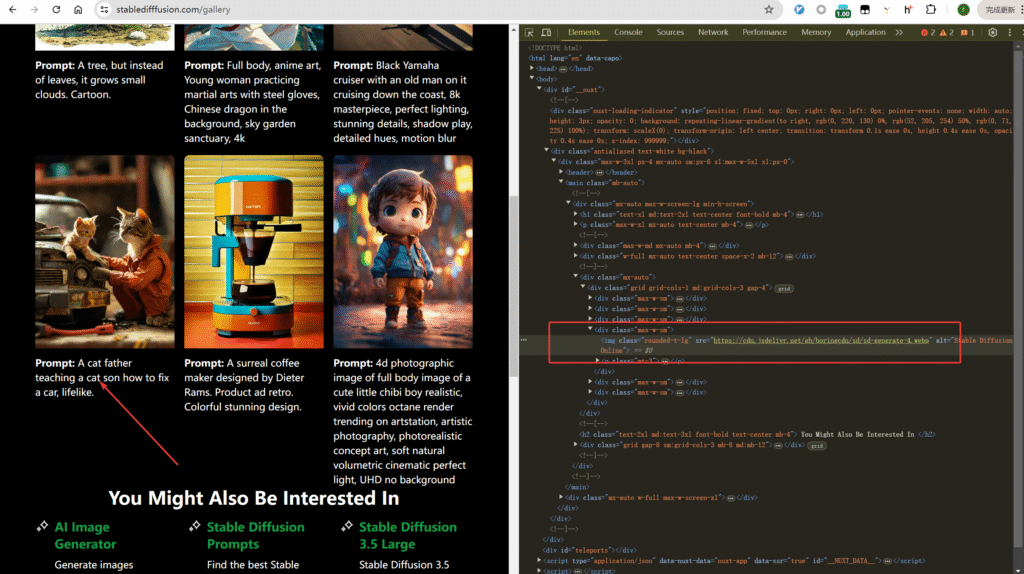
Then we can parse the src addresses on the page using xpath.
from parsel import Selector
import requests

url = "https://stabledifffusion.com/gallery"

payload = {}
headers = {
  'accept': 'text/html,application/xhtml+xml,application/xml;q=0.9,image/avif,image/webp,image/apng,*/*;q=0.8,application/signed-exchange;v=b3;q=0.7',
  'cookie': '_ga=GA1.1.258999226.1754806446; _ga_C4QP4FPRFF=GS2.1.s1754806445$o1$g1$t1754807302$j44$l0$h0',
  'pragma': 'no-cache',
  'referer': 'https://stabledifffusion.com/',
  'user-agent': 'Mozilla/5.0 (Windows NT 10.0; Win64; x64) AppleWebKit/537.36 (KHTML, like Gecko) Chrome/126.0.0.0 Safari/537.36'
}

def get_stable_diffusion_images():
    response = requests.request("GET", url, headers=headers, data=payload)
    text = response.text
    resp = Selector(text=text)
    image_urls = resp.xpath('//div[@class="grid grid-cols-1 md:grid-cols-3 gap-4"]/div[@class="max-w-sm"]/img/@src').getall()
    return image_urls
The output will be the following url link:
['https://cdn.jsdelivr.net/gh/boringcdn/sd/sd-generate-1.webp',
 'https://cdn.jsdelivr.net/gh/boringcdn/sd/sd-generate-2.webp',
 'https://cdn.jsdelivr.net/gh/boringcdn/sd/sd-generate-3.webp',
 'https://cdn.jsdelivr.net/gh/boringcdn/sd/sd-generate-4.webp',
 'https://cdn.jsdelivr.net/gh/boringcdn/sd/sd-generate-5.webp',
 'https://cdn.jsdelivr.net/gh/boringcdn/sd/sd-generate-6.webp']
Then write a download function:
def download_image(image_url, filename):
    response = requests.get(image_url)
    if response.status_code == 200:
        with open(filename, 'wb') as file:
            file.write(response.content)
        print(f"Image {filename} downloaded successfully.")
    else:
        print(f"Failed to download image {filename}. Status code: {response.status_code}")
Images on Stable Diffusion are in webp format, and the Pillow library can easily read webp format files.
from PIL import Image

# open WebP format image
with Image.open("sd-generate-1.webp") as img:
    # display image info
    print(f"format: {img.format}")
    print(f"size: {img.size}")
    # save as jpeg format
    img.save("image.jpg", "JPEG")
The above code can save webp format files as jpeg format.
Next, we can perform basic and advanced processing on image files.
Resizing and Compressing to Reduce Storage Space
For example, the following code reduces the length and width of the original image to half, and then uses the LANCZOS compression algorithm to further reduce the size.
from PIL import Image

# Open WebP image
with Image.open("image.webp") as img:
    # Display original image information
    print(f"Original format: {img.format}")
    print(f"Original size: {img.size}")  # (width, height)

    # Define new size, e.g., reduce to half the original size
    new_width = img.size[0] // 2
    new_height = img.size[1] // 2
    new_size = (new_width, new_height)

    # Resize the image using high-quality scaling algorithm
    resized_img = img.resize(new_size, Image.Resampling.LANCZOS)

    # Display modified information
    print(f"New size: {resized_img.size}")

    # Save the modified image (can keep WebP format or convert to other formats)
    resized_img.save("resized_image.jpg", "jpeg")  # Keep jpe format
Or, when training YOLO, input images are required to have a fixed size (such as 640×640, 416×416), so size normalization (Resize to Input Size) is needed.
Saving images with a fixed size:
resized_img = img.resize((640,640), Image.Resampling.LANCZOS)
resized_img.save("resized_image.jpg", "jpeg") # Keep jpg format- In addition to fixed image sizes, normalizing images is also a common operation in YOLO and other image processing:
- Supported normalization methods:
0-1: Map pixel values from [0,255] to [0,1], the most commonly used normalization method-0.5-0.5: Map pixel values to [-0.5,0.5], preferred by some modelsz-score: Standardize to a distribution with a mean of 0 and a standard deviation of 1, suitable for scenes sensitive to light changesuint8: Denormalization, convert the processed image back to 0-255 integer format for saving or display The following Python code demonstrates the above 4 image normalization methods.
   import cv2
   import numpy as np
   from PIL import Image

   def normalize_pixel_values(image, method='0-1'):
       """
       Image pixel value normalization function

       Parameters:
           image: Input image, can be a PIL Image or NumPy array
           method: Normalization method
                   '0-1': Normalize to [0, 1] range
                   '-0.5-0.5': Normalize to [-0.5, 0.5] range
                   'z-score': Z-score standardization
                   'uint8': Convert to 0-255 integers (denormalization)
       Returns:
           Normalized image
       """
       # Ensure input is a NumPy array
       if isinstance(image, Image.Image):
           image = np.array(image)

       # Create a copy to avoid modifying the original image
       normalized = image.copy().astype(np.float32)

       if method == '0-1':
           # Normalize to [0, 1] range
           if normalized.max() > 0:
               normalized = normalized / 255.0

       elif method == '-0.5-0.5':
           # Normalize to [-0.5, 0.5] range
           normalized = (normalized / 255.0) - 0.5

       elif method == 'z-score':
           # Z-score standardization (x - mean) / std
           mean = np.mean(normalized)
           std = np.std(normalized)
           if std > 0:
               normalized = (normalized - mean) / std
           else:
               normalized = normalized - mean

       elif method == 'uint8':
           # Convert back to 0-255 integer format (denormalization)
           normalized = np.clip(normalized, 0, 255).astype(np.uint8)

       else:
           raise ValueError(f"Unsupported normalization method: {method}")

       return normalized

   # Usage example
   if __name__ == "__main__":
       # Read image
       image_path = "input_image.jpg"

       # Read with OpenCV
       cv_image = cv2.imread(image_path)
       # Convert to RGB (OpenCV uses BGR by default)
       cv_image_rgb = cv2.cvtColor(cv_image, cv2.COLOR_BGR2RGB)

       # Read with PIL
       pil_image = Image.open(image_path)

       # Test different normalization methods
       methods = ['0-1', '-0.5-0.5', 'z-score']
       for method in methods:
           # Process OpenCV image
           normalized_cv = normalize_pixel_values(cv_image_rgb, method)
           print(f"Method: {method}, OpenCV image - Pixel range: [{normalized_cv.min():.4f}, {normalized_cv.max():.4f}]")

           # Process PIL image
           normalized_pil = normalize_pixel_values(pil_image, method)
           print(f"Method: {method}, PIL image - Pixel range: [{normalized_pil.min():.4f}, {normalized_pil.max():.4f}]")

       # Test denormalization (convert normalized image back to 0-255)
       normalized = normalize_pixel_values(cv_image_rgb, '0-1')
       denormalized = normalize_pixel_values(normalized, 'uint8')
       print(f"Denormalization - Pixel range: [{denormalized.min()}, {denormalized.max()}], Data type: {denormalized.dtype}")

       # Save denormalized image
       cv2.imwrite("denormalized_image.jpg", cv2.cvtColor(denormalized, cv2.COLOR_RGB2BGR))
Image Quality Optimization (Improving Feature Clarity)
Algorithms can be used to improve image quality.
Common algorithms for image data processing:
| Image Problem | Recommended Method | Tool Library |
|---|---|---|
| Obvious noise (spots, grains) | Non-local mean denoising / bilateral filtering | OpenCV |
| Low contrast (hazy) | CLAHE adaptive histogram equalization | OpenCV |
| Slight blurriness (unclear edges) | Laplacian sharpening | OpenCV |
| Severe blurriness / low resolution | Deep learning super-resolution (Real-ESRGAN) | Real-ESRGAN + PyTorch |
The most basic way is to use OpenCV for image quality improvement, denoising, and sharpening.
import cv2
import numpy as np
from matplotlib import pyplot as plt

def denoise_image(image_path, method='non_local_means'):
    """
    Image denoising processing

    :param image_path: Input image path
    :param method: Denoising method
                   'gaussian': Gaussian filtering (suitable for Gaussian noise)
                   'median': Median filtering (suitable for salt-and-pepper noise)
                   'bilateral': Bilateral filtering (denoises while preserving edges)
                   'non_local_means': Non-local means denoising (better results but slower)
    :return: Denoised image
    """
    # Read image (in BGR format)
    img = cv2.imread(image_path)
    if img is None:
        raise ValueError("Unable to read image, please check the path")

    # Convert to RGB format (for display)
    img_rgb = cv2.cvtColor(img, cv2.COLOR_BGR2RGB)

    # Denoising processing
    if method == 'gaussian':
        # Gaussian filtering: (5,5) is kernel size, 0 is standard deviation
        denoised = cv2.GaussianBlur(img, (5, 5), 0)
    elif method == 'median':
        # Median filtering: suitable for removing salt-and-pepper noise, 5 is kernel size
        denoised = cv2.medianBlur(img, 5)
    elif method == 'bilateral':
        # Bilateral filtering: 9 is diameter, 75 is color standard deviation, 75 is space standard deviation
        denoised = cv2.bilateralFilter(img, 9, 75, 75)
    elif method == 'non_local_means':
        # Non-local means denoising: suitable for Gaussian noise, better than traditional filtering
        denoised = cv2.fastNlMeansDenoisingColored(img, None, 10, 10, 7, 21)
    else:
        raise ValueError(f"Unsupported denoising method: {method}")

    # Convert to RGB for display
    denoised_rgb = cv2.cvtColor(denoised, cv2.COLOR_BGR2RGB)

    # Display comparison
    plt.figure(figsize=(10, 5))
    plt.subplot(121), plt.imshow(img_rgb), plt.title('Original Image')
    plt.subplot(122), plt.imshow(denoised_rgb), plt.title(f'Denoised ({method})')
    plt.show()

    return denoised

# Usage example
if __name__ == "__main__":
    image_path = "lena.jpg"
    # Try different denoising methods
    denoised = denoise_image(image_path, method='non_local_means')
    # Save result
    cv2.imwrite("denoised_lena.jpg", denoised)
We use the famous Lena image for image quality improvement.
The original image is as follows:

Run the program
python image_process.pyThe output image
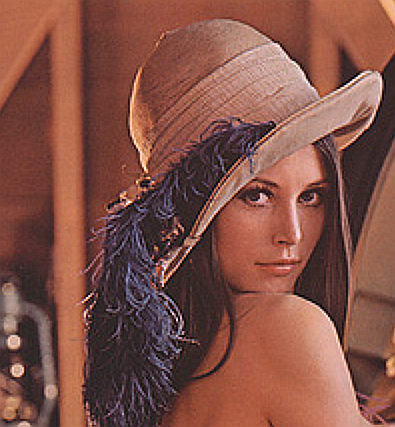
The contours of the person in the image are clearer, with more obvious lines.
Image Storage
For image storage, you can use Amazon S3 object storage or build your own storage engine.
Storing images in MongoDB usually has two methods: storing the binary data of the image (suitable for small images) or storing the file path of the image (suitable for large images or scenarios requiring frequent access).
The specific implementation methods are as follows:
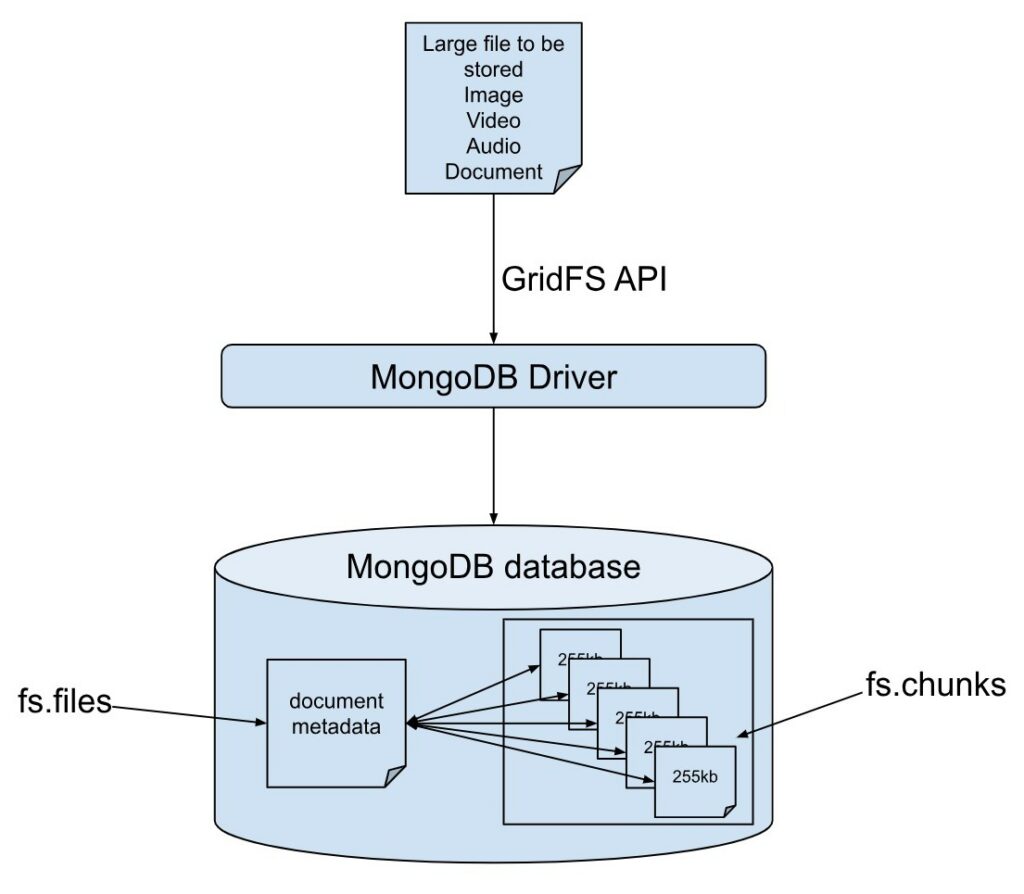
Method 1: Directly store image binary data (GridFS)
For files larger than 16MB, MongoDB recommends using the GridFS specification for storage. GridFS splits files into multiple chunks (256KB by default) for storage, suitable for large files such as images and videos.
from pymongo import MongoClient
from gridfs import GridFS
import cv2
import numpy as np

class MongoDBImageStorage:
    def __init__(self, db_name="image_database"):
        # Connect to MongoDB (default local connection)
        self.client = MongoClient('mongodb://localhost:27017/')
        # Create or get database
        self.db = self.client[db_name]
        # Initialize GridFS
        self.fs = GridFS(self.db)

    def store_image(self, image_path, metadata=None):
        """
        Store image in MongoDB

        :param image_path: Local path to the image
        :param metadata: Optional metadata (e.g., tags, capture time, etc.)
        :return: Stored file ID
        """
        try:
            # Read image binary data
            with open(image_path, 'rb') as f:
                image_data = f.read()

            # Extract filename
            filename = image_path.split('/')[-1]

            # Store file with optional metadata
            file_id = self.fs.put(
                image_data,
                filename=filename,
                content_type=f'image/{filename.split(".")[-1]}',
                **(metadata or {})
            )

            print(f"Image stored successfully. File ID: {file_id}")
            return file_id

        except Exception as e:
            print(f"Error storing image: {str(e)}")
            return None

    def retrieve_image(self, file_id, output_path):
        """
        Retrieve image from MongoDB and save to local storage

        :param file_id: File ID of the image
        :param output_path: Output path for the image
        :return: Success status (True/False)
        """
        try:
            # Get file by ID
            file = self.fs.get(file_id)

            # Read binary data
            image_data = file.read()

            # Save to local storage
            with open(output_path, 'wb') as f:
                f.write(image_data)

            print(f"Image retrieved successfully. Saved to: {output_path}")
            return True

        except Exception as e:
            print(f"Error retrieving image: {str(e)}")
            return False

    def get_image_metadata(self, file_id):
        """Get image metadata"""
        try:
            file = self.fs.get(file_id)
            return {
                "filename": file.filename,
                "content_type": file.content_type,
                "upload_date": file.upload_date,
                "length": file.length,
                "metadata": file.metadata
            }
        except Exception as e:
            print(f"Error getting metadata: {str(e)}")
            return None

    def delete_image(self, file_id):
        """Delete image"""
        try:
            self.fs.delete(file_id)
            print(f"Image with ID {file_id} deleted successfully")
            return True
        except Exception as e:
            print(f"Error deleting image: {str(e)}")
            return False

# Usage example
if __name__ == "__main__":
    # Initialize storage instance
    storage = MongoDBImageStorage()

    # Store image (with optional metadata)
    metadata = {"category": "nature", "resolution": "1920x1080"}
    file_id = storage.store_image("test_image.jpg", metadata)

    if file_id:
        # Get metadata
        print("Image metadata:", storage.get_image_metadata(file_id))

        # Retrieve and save image
        storage.retrieve_image(file_id, "retrieved_image.jpg")

        # Delete image (uncomment as needed)
        # storage.delete_image(file_id)
Method 2: Store image paths (recommended for large-scale applications)
For large images or high-concurrency scenarios, a more efficient way is to store images in a file system (such as local disks, cloud storage) and only save image paths and metadata in MongoDB.
    def store_image(self, image_path, metadata=None):
        """
        Store image in MongoDB

        :param image_path: Local path to the image file
        :param metadata: Optional metadata (e.g., tags, capture time, etc.)
        :return: Stored file ID
        """
        try:
            # Read image binary data
            with open(image_path, 'rb') as f:
                image_data = f.read()

            # Extract filename
            filename = image_path.split('/')[-1]

            # Store file with optional metadata
            file_id = self.fs.put(
                image_data,
                filename=filename,
                content_type=f'image/{filename.split(".")[-1]}',
                **(metadata or {})
            )

            print(f"Image stored successfully. File ID: {file_id}")
            return file_id

        except Exception as e:
            print(f"Error storing image: {str(e)}")
            return None

    def retrieve_image(self, file_id, output_path):
        """
        Retrieve image from MongoDB and save to local filesystem

        :param file_id: File ID of the image
        :param output_path: Local path to save the retrieved image
        :return: Boolean indicating success status
        """
        try:
            # Get file by ID
            file = self.fs.get(file_id)

            # Read binary data
            image_data = file.read()

            # Save to local filesystem
            with open(output_path, 'wb') as f:
                f.write(image_data)

            print(f"Image retrieved successfully. Saved to: {output_path}")
            return True

        except Exception as e:
            print(f"Error retrieving image: {str(e)}")
            return False

    def get_image_metadata(self, file_id):
        """Retrieve image metadata"""
        try:
            file = self.fs.get(file_id)
            return {
                "filename": file.filename,
                "content_type": file.content_type,
                "upload_date": file.upload_date,
                "length": file.length,
                "metadata": file.metadata
            }
        except Exception as e:
            print(f"Error getting metadata: {str(e)}")
            return None

    def delete_image(self, file_id):
        """Delete image from storage"""
        try:
            self.fs.delete(file_id)
            print(f"Image with ID {file_id} deleted successfully")
            return True
        except Exception as e:
            print(f"Error deleting image: {str(e)}")
            return False

# Usage example
if __name__ == "__main__":
    # Initialize storage instance
    storage = MongoDBImageStorage()

    # Store image (with optional metadata)
    metadata = {"category": "nature", "resolution": "1920x1080"}
    file_id = storage.store_image("test_image.jpg", metadata)

    if file_id:
        # Get metadata
        print("Image metadata:", storage.get_image_metadata(file_id))

        # Retrieve and save image
        storage.retrieve_image(file_id, "retrieved_image.jpg")

        # Delete image (uncomment as needed)
        # storage.delete_image(file_id)
Storing the images obtained by web crawlers on a cloud server allows the crawler program to be expanded into a distributed system, where different crawler services synchronize data to the central server.
With API interfaces like FastAPI and Express, and a configured domain name, you can create a simple file storage system like AWS S3.