
Proxy technology is often used in web crawling, where a server acts as an intermediary to access other host servers. It is typically employed when the IP address of the crawling program has been blocked by the target server.
Intranet penetration technology, however, operates somewhat in the opposite manner.
Why Do You Need Intranet Penetration?
- “How to remotely access a home computer without a public IP?”
- “The company has blocked ports 22/3389, making SSH/RDP connections impossible!”
- “WeChat debugging requires ports 80/443, but local development is limited to localhost?”
- How to connect to the company’s intranet via a dedicated line to view logs, etc.
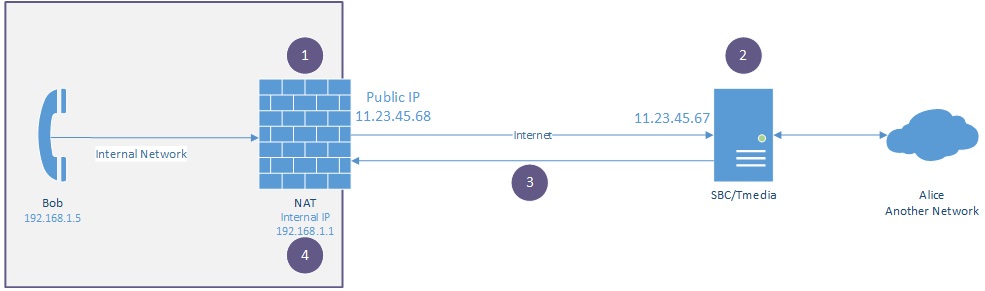
Intranet penetration uses a server as a relay 跳板,allowing devices in different locations and with different functions, such as laptops and mobile phones, to access devices at home that do not have an independent public IP address, such as a NAS server storing personal photos and movies. If you want to access this data from the office or other places, you need to use intranet penetration.
Intranet penetration, also known as NAT penetration, is a technical method to expose devices or services located in the intranet to the public network, enabling external networks to access intranet resources.
Common Implementation Methods
Port Mapping
- Principle: Configure network devices such as routers or firewalls to map specific ports of the external network to specific ports of devices in the internal network. When an external network request accesses a specific port of the router, the router forwards the request to the corresponding device port in the internal network, thereby enabling external access to internal devices.
- Applicable Scenarios: Suitable for scenarios where a Web server, FTP server, or other services are set up in the intranet, and it is desired to allow external users to access these services through a public IP.
VPN (Virtual Private Network)
- Principle: Establish a secure virtual channel over the public network to connect the intranet with the external network. Users connect to the VPN server through a VPN client and obtain a virtual public IP address, allowing them to access intranet resources as if they were on the local network. Data is usually encrypted during transmission to ensure security and privacy.
- Applicable Scenarios: Commonly used in remote work scenarios, where employees can securely access internal company network resources such as file servers and databases through a VPN.
Reverse Proxy
- Principle: There is a reverse proxy server on the public network that receives requests from the external network and forwards them to the corresponding servers in the intranet according to certain rules. The reverse proxy server appears as a single server to the outside, hiding the real IP address and architecture of the intranet servers. It can also perform tasks such as request caching, filtering, and load balancing.
- Applicable Scenarios: Suitable for scenarios where services need to be provided externally while protecting the security and privacy of intranet servers. For example, in the server architecture of large websites, reverse proxies are often used to improve website performance and security.
Intranet Penetration Tools
- Principle: Achieved with the help of some specialized intranet penetration tools. These tools usually adopt a client-server model, with a server on the public network acting as a relay. Intranet devices install clients and establish connections with the public network server. When an external network request accesses intranet resources, the request is first sent to the public network server, which then forwards it to the corresponding device of the intranet client.
- Applicable Scenarios: For individual users or small enterprises without a public IP or who do not want to perform complex network configurations, using intranet penetration tools can conveniently and quickly expose intranet services to the public network. For example, individual developers can use intranet penetration tools to allow external users to access tests when debugging Web applications locally.
This tutorial introduces several very useful intranet penetration tools in different fields, all of which are frequently used by me in daily work.
frp
This is one of the simplest yet very useful intranet penetration tools.
Its architectural topology is as follows:
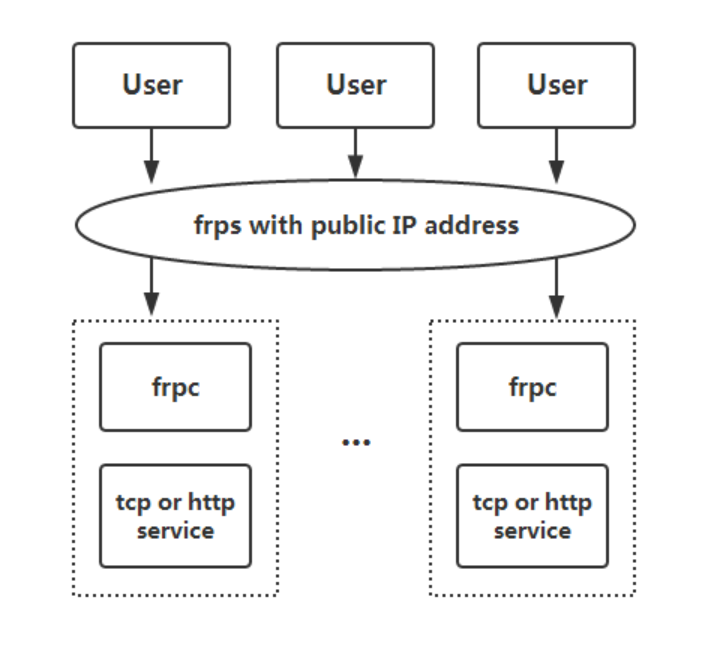
Its official repository is: https://github.com/fatedier/frp
FRP (Fast Reverse Proxy) uses a 4MB binary file to instantly map an “intranet” to a “cloud host”. It is free, open-source, and cross-platform, with advantages such as reverse proxy, intranet penetration, multi-protocol support, and minimal configuration.
Preparation Materials
| Role | Requirement | Example |
|---|---|---|
| Server (frps) | Cloud host with public IP | Cloud server |
| Client (frpc) | Intranet device | Computer / NAS / Raspberry Pi |
| Domain name (optional) | Resolved to public IP | 1.1.1.1 or nas.example.com |
Download the binary package
wget https://github.com/fatedier/frp/releases/download/v0.60.0/frp_0.60.0_linux_amd64.tar.gz
tar -xzf frp_0.60.0_linux_amd64.tar.gz
cd frp_0.60.0_linux_amd64
There are only 6 files in the package. Those starting with frps are for the server, and those starting with frpc are for the client.
The latest version is v0.64.0. You can choose according to your needs. Generally, it is not recommended to use the latest version to avoid potential issues.
Server Configuration (frps.toml)
Create /etc/frp/frps.toml. The specific path can be chosen according to your preference. The configuration file content is as follows:
bindPort = 7000         # Client connection port
vhostHTTPPort = 80      # WeChat/website debugging
vhostHTTPSPort = 443
auth.token = "abc123"   # Authentication, do not use 123456
Set up one-click systemd startup
This tool must start on boot; otherwise, a power outage or restart will make all your efforts in vain.
sudo cp frps /usr/local/bin/
sudo vim /etc/systemd/system/frps.service
[Unit]
Description=FRP Server
After=network.target
[Service]
Type=simple
ExecStart=/usr/local/bin/frps -c /etc/frp/frps.toml
Restart=always
[Install]
WantedBy=multi-user.targetsudo systemctl enable --now frps
# Check status
sudo systemctl status frpsClient Configuration (frpc.toml)
Let’s look at the client configuration, taking “mapping the home Windows remote desktop to the public network” as an example:
serverAddr = "x.x.x.x"   # Your public IP
serverPort = 7000
auth.token = "abc123"

[[proxies]]
name = "rdp"
type = "tcp"
localIP = "127.0.0.1"
localPort = 3389
remotePort = 13389       # Public network port
Windows Startup on Boot
Place frpc.exe and frpc.toml in C:\frp\
Win+R → shell:startup → Create a new frpc.vbs:
After restarting, public IP:13389 → direct remote desktop!
5 High-Frequency Scenario Templates
There is a reason why this frp software has so many stars. Because it has the following high-frequency scenarios.
| Scenario | Type | Key Configuration | Remarks |
|---|---|---|---|
| Remote Desktop | tcp | localPort=3389 | Change remote port to reduce risks |
| NAS Web | http | customDomains=nas.x.com | Domain name resolution required |
| WeChat Debugging | http | localPort=80 | Use 8080+ to avoid filing |
| SSH | tcp | localPort=22 | It is recommended to change to 2222 |
| Synology DSM | https | type=https | Certificate required |
Peer-to-Peer Intranet Penetration
Peer-to-peer, or P2P, is a direct communication method that does not go through a central server. frp provides an xtcp proxy type for scenarios where server bandwidth is limited and large amounts of data need to be transmitted.
Peer-to-peer communication requires frpc to be deployed on both ends, and a direct connection is established through the server. The specific configuration is as follows:
XTCP cannot penetrate all types of NAT devices. If penetration fails, you can try the stcp mode (i.e., proxy mode).
If there is an error in the configuration file, delete the comments, use utf-8 encoding, use a better editor, and do not open it with a text editor.
The server is only responsible for “coordinating the establishment of P2P connections” and does not forward actual data. The configuration is extremely simple:
Create an frps.ini file on the server
bindPort = 7000
auth.token = "demo123321"
Start the server
# Linux or macOS
./frps -c ./frps.ini

# Windows (Command Prompt or PowerShell)
frps.exe -c frps.ini
2. Configure Client A (Device Initiating the Connection)
Assume Client A needs to access port 3389 (remote desktop) of Client B. The configuration is as follows:
Create an frpc.ini file on Client A:
[common]
server_addr = Public server IP  # Replace with your frp server IP
server_port = 7000         # Consistent with the server's bind_port

# Configure rules for P2P access to Client B
[p2p_remote]
type = tcp role = active # Role to actively initiate the connection local_ip = 127.0.0.1 # Client A’s local IP (fixed value) local_port = 0 # No need to specify local port in P2P mode, fill in 0 remote_port = 3389 # Target port (port to be exposed by Client B) peer_name = client_b # Corresponds to the peer_name in [common] of Client B
Start Client A:
# Linux or macOS
./frpc -c ./frpc.ini

# Windows
frpc.exe -c frpc.ini- 3. Configure Client B (Device to Be Accessed) Client B needs to expose port
3389for access by Client A. The configuration is as follows: - Create an
frpc.inifile on Client B
  [common]
  server_addr = Public server IP  # Same as Client A
  server_port = 7000         # Consistent with the server's bind_port
  peer_name = client_b       # Custom name, must match the peer_name in Client A

  # Expose local port 3389 (remote desktop) for P2P access
[p2p_remote]
type = tcp role = passive # Role to passively accept connections local_ip = 127.0.0.1 # Client B’s local IP local_port = 3389 # Local port to be exposed (such as remote desktop port)
Start Client B:
  # Linux or macOS
  ./frpc -c ./frpc.ini

  # Windows
  frpc.exe -c frpc.ini
Verify P2P Connection
- After both Client A and B are started, access Client B from Client A in the following way:
- Connection address:
127.0.0.1:local random port(the frp client will automatically assign a local port; check the log of Client A to obtain it, such aslocal port 6000) - Example: Use remote desktop to connect to
127.0.0.1:6000, and you can directly connect to port 3389 of Client B
- Confirm the connection mode:
- If
[p2p_remote] success to establish p2p connectionappears in the log, it indicates that the P2P connection is successful (data does not go through the server); - If
fallback to proxy modeappears, it means that P2P penetration failed and automatically degraded to server relay mode (may be due to network environment restrictions, such as strict NAT type).
Key Notes
- Network Environment Restrictions
- P2P mode depends on the NAT type of the device (full-cone, address-restricted NAT are easier to succeed, port-restricted or symmetric NAT may fail).
- If P2P fails, you can try configuring “UPnP” or “port mapping” for Clients A/B in the router to improve penetration success rate.
- Multi-Port Configuration
- To map multiple ports, add more rules to the configuration files of Clients A and B, ensuring that the rule names are consistent on both sides (such as
[p2p_remote]in the example).
- Security
- It is recommended to add
tokenauthentication to the frp server (addtoken = your secret keyinfrps.iniand[common]of allfrpc.ini) to prevent unauthorized device connections. - Restrict the range of exposed ports to avoid opening unnecessary services.
Through the above configuration, two intranet devices can establish a direct P2P connection with the coordination of the frp server, which is suitable for scenarios sensitive to latency and bandwidth. If the P2P mode is unstable, you can fallback to the ordinary proxy mode (just change role to client).