The previous two tutorials introduced frp and zerotier as intranet penetration tools, but their configurations might not be very user-friendly for newcomers. However, there’s another foolproof intranet penetration tool that requires zero configuration – even beginners can handle it with ease.
Tailscale is a zero-configuration virtual private network (VPN) tool based on the WireGuard protocol. Its core function is to enable devices in different network environments (such as home computers, company servers, mobile phones, NAS, etc.) to communicate directly as if they were on the same local area network, without the need for complex network configurations.
Simply put, what problems can it solve?
Suppose you have these needs:
- Access your home NAS (for storing photos/files) from your work computer while on a business trip;
- Team members in different locations need to quickly access the same server;
- Want to connect your phone directly to home smart devices (such as cameras, printers);
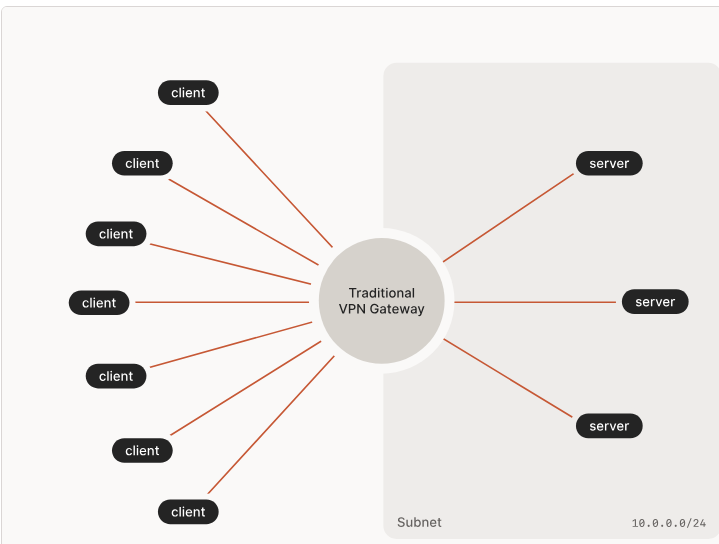
Traditional methods may require manual configuration of port forwarding, public IP, firewalls, etc., which are complicated and error-prone. Tailscale, on the other hand, can handle all this automatically. You just need to install the client on your device and log in to your account, and the devices will “recognize” each other and communicate directly.
It focuses on “simplicity and ease of use,” allowing you to quickly set up a virtual local area network (VLAN) without complex network knowledge.
Core Features of Tailscale
- Zero configuration, ready to use out of the boxNo need to manually set IPs, ports, keys, or firewall rules. After installation and logging in to your account, the device will automatically join your “virtual local area network” and be assigned a unique virtual IP (e.g.,
100.x.y.z), which can be used directly for mutual access. - Based on WireGuard, secure and efficientIt uses the WireGuard protocol (a recognized efficient and secure VPN protocol) at the bottom. All data is encrypted by default, and it prioritizes direct P2P connections between devices (for faster speed and lower latency). Only when the network is restricted will data be forwarded through relay servers.
- Cross-platform coverageSupports Windows, macOS, Linux, iOS, Android, and even routers, NAS, Raspberry Pi, etc. As long as a device can install the client, it can join the network.
- Flexible permission managementYou can manage all devices through the web backend (Tailscale Console), such as renaming devices, removing abnormal devices, and setting which devices can access which resources.
Who Is It For?
- Individual users: Remotely access home devices (NAS, computers, cameras);
- Small teams: Quickly set up temporary collaborative networks to share servers or internal tools;
- Non-technical users/beginners: Those who don’t want to deal with complex network configurations but need cross-network device access.
Tailscale is essentially a “simplified VPN tool.” It automates all the complex configuration tasks in traditional VPNs (such as port mapping, key management, NAT traversal), making it easy for ordinary people to set up a cross-network virtual local area network. If you need to “access home/company devices from anywhere,” it’s probably one of the simplest solutions.
Tailscale Topology Diagram
- Tailscale Installation and Usage Tutorial 1. Download the Client Clients for all systems can be downloaded from the Tailscale official website or installed through app stores:
- Windows/macOS: Download the installer from the official website and double-click to install (for macOS, you need to allow installation in “System Settings – Security & Privacy”).
- Linux: Install via package manager (e.g., Ubuntu can directly use
sudo apt install tailscale, or refer to the official tutorial for the corresponding distribution).
curl -fsSL https://tailscale.com/install.sh | shor
  curl -fsSL https://pkgs.tailscale.com/stable/debian/bookworm.noarmor.gpg | sudo tee /usr/share/keyrings/tailscale-archive-keyring.gpg >/dev/null
  curl -fsSL https://pkgs.tailscale.com/stable/debian/bookworm.tailscale-keyring.list | sudo tee /etc/apt/sources.list.d/tailscale.list

  # install Tailscale
  sudo apt-get update
sudo apt-get install tailscale- Mobile devices: For iOS, search for “Tailscale” in the App Store; for Android, download the APK from Google Play or the official website.
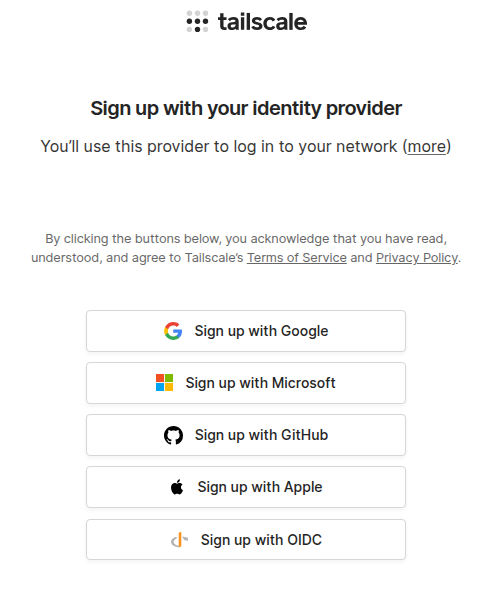
- Registration and Login Open the client after installation. You need to register an account for the first use:
- Supports login with email, Google, Microsoft, GitHub, and other accounts (it’s recommended to use a commonly used email for easy device management).
- After logging in, Tailscale will automatically generate a virtual IP for the current device (in a format like
100.x.y.z, unique across the network) and add it to your “Tailscale network.”
Basic Usage: Mutual Device Access
1. View Device List
After logging in, in the Tailscale client on any device, click “Devices” or “Machines” to see a list of all devices logged into the same account, including:
- Device name (can be customized, such as “Home Computer” or “Office Server”);
- Virtual IP (e.g.,
100.123.45.67, used for communication between devices); - Online status (green indicates online).
2. Device Communication (Taking Ping Test as an Example)
Suppose you have two devices:
- Device A (computer): Virtual IP is
100.1.2.3 - Device B (mobile phone): Virtual IP is
100.4.5.6
On Device A’s terminal/command prompt, enter:
# Common to Windows, Linux, and macOS
ping 100.4.5.6
If you get “replies,” it means the two devices have successfully established a connection (the mobile client needs to keep running in the background).
3. Access Intranet Services (e.g., NAS, Web Services)
If a device (such as a home NAS) provides services in the intranet (e.g., the NAS management page at 192.168.1.100:5000), other devices can access it through the following steps:
- Install and log in to Tailscale on the NAS to get its virtual IP (e.g.,
100.7.8.9). - On another device (such as a company computer), enter
http://100.7.8.9:5000in the browser to directly access the NAS management page.
Practical Features (Essential for Beginners)
1. Custom Device Names
The default device name may be a random string, but you can change it to an easy-to-remember name:
- Click the device in the Tailscale client → “Edit Name” (or log in to the Tailscale management backend to batch modify).
2. Subnet Routing (Access the Entire Intranet)
By default, devices can only access those with Tailscale installed. To access the entire intranet where a device is located (e.g., all home devices in 192.168.1.x):
- On the “gateway device” (such as a home router or a frequently powered-on computer), open the Tailscale client → “Settings” → enable “Subnet Routing” and add the intranet segment (e.g.,
192.168.1.0/24). - Log in to the Tailscale management backend → “Access Controls” and allow subnet routing in the configuration (enabled by default, beginners can skip this step).
- Other devices can then access the entire intranet through the gateway device’s virtual IP (e.g.,
192.168.1.200).
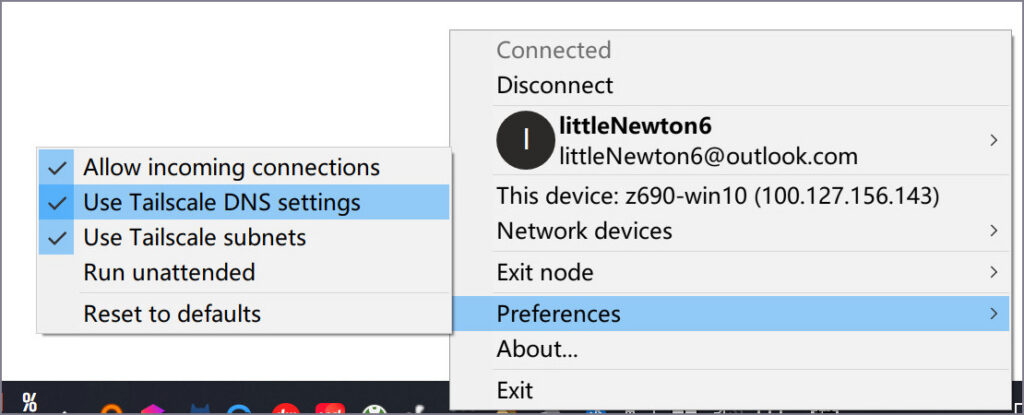
3. Exit Node (Optional)
If you want a device to access the internet through another device’s network (e.g., using a home network to access overseas websites):
- On the “exit device” (such as a home computer), open the Tailscale client → “Settings” → enable “Act as exit node.”
- On other devices’ Tailscale clients → “Exit Node” → select the exit device set earlier to access the internet through its network.
Tailscale HTTPS
Generally, we consider services in the intranet to be trusted, and the application scope of zero-trust networks is limited. Therefore, using HTTPS in the intranet may seem unnecessary, and it’s sufficient to add a layer of HTTPS to NGINX ingress traffic. However, in some scenarios, intranet HTTPS is still necessary – if only to avoid browser warnings.
- Browser insecurity warnings
- Some services only provide HTTPS access, such as ESXi control panel, vSphere control panel, Cockpit control panel, etc.
Tailscale provides an ACME feature that can automatically apply for Let’s Encrypt certificates.
To do this, we first need to enable the HTTPS certificate service on the Tailscale configuration page:
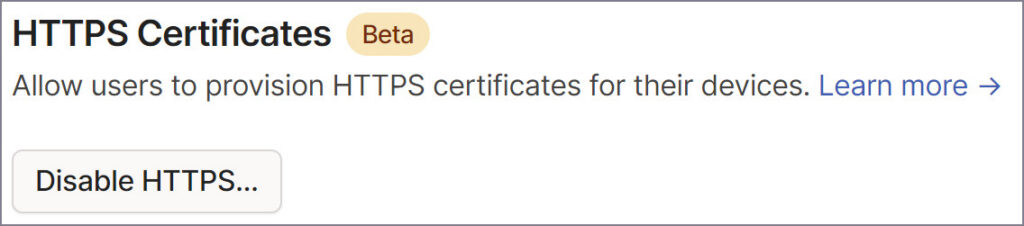
Ensure this item is enabled.
Then, execute the following command:
tailscale cert xxxxxx.cat-silverside.ts.netYou will get the private key and corresponding certificate in the current directory:
xxxxxx.cat-silverside.ts.net.crt
xxxxxx.cat-silverside.ts.net.key
sudo cp xxxxxxcat-silverside.ts.net.key xxxxxx.cat-silverside.ts.net.crt /etc/cockpit/ws-certs.d/
sudo systemctl restart cockpitNow, you can use the MagicDNS domain https://xxxxxx.cat-silverside.ts.net:9090/ to open the HTTPS service page.
Notes
- Free plan limitations: The free plan supports up to 20 devices with no bandwidth restrictions, suitable for individuals or small teams.
- Device online status: Devices need to keep the Tailscale client running and connected to the internet; otherwise, they will show as offline (mobile devices can lock the process in the background to prevent it from being killed).
- Privacy and security: All communications are encrypted, and Tailscale cannot view the content of the data; the management backend allows remote removal of devices to prevent abuse if a device is lost.
Well, that’s all for the introduction of intranet penetration tools in this issue. I hope you’ve gained something from this series.